Struggling with poor network performance?
This page is meant as a quick reference for how to use these tools, and as (admittedly elementary) validation for how accurate each function may or may not be.
Packet Loss
Using the following command:
tc qdisc add dev eth2 root netem loss 10%
I was able to test how accurate this was with a simple ping test. By pinging 100 times, I can look at the summary and have an estimate of the packet loss (to see if it matched the 10%). Of course, 10% loss is much higher than you should see in most networks, but it makes the numbers easier. I ran the test multiple times, and got either 10% exactly or slightly above/below that value (9%, 10%, 15%, 8%, 10%, 8%). By averaging the results (a total of 600 samples), I got exactly 10%, which is pretty darn good. I would have expected a need for a larger sample set, but this shows that the tool is fairly accurate in this regard. So this feature can be used with the understanding that the percentage of packet loss will approach the value given, though it may not be exact, especially for short transfers (which is good – we want the packet loss to be random rather than simply dropping every 10th packet).

An optional correlation may also be added (I did not test this). This causes the random number generator to be less random and can be used to emulate packet burst losses. So if you had:
tc qdisc add dev eth2 root netem loss 0.3% 25%
Probn = .25 * Probn-1 + .75 * Random
The smallest possible non-zero value that can be specified is 0.0000000232%
Fixed Delay
To test fixed delay, first I pinged 10 times with no added delay to get a baseline.
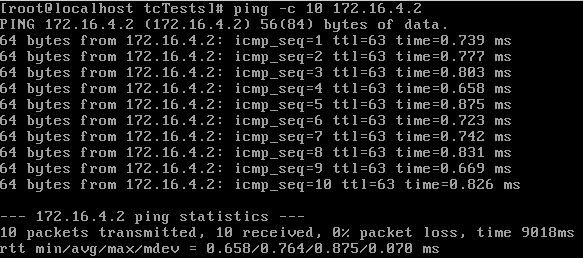
Then I used the following command and pinged again:
tc qdisc add dev eth3 root netem delay 3ms
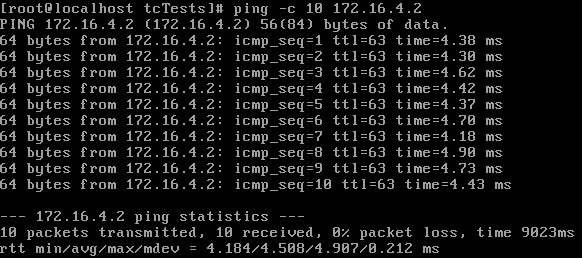
These numbers suggest there is a small amount of overhead to the delay injection. So I ran the test again with a larger value to verify that the overhead is fixed, rather than a percentage.
tc qdisc add dev eth3 root netem delay 90ms
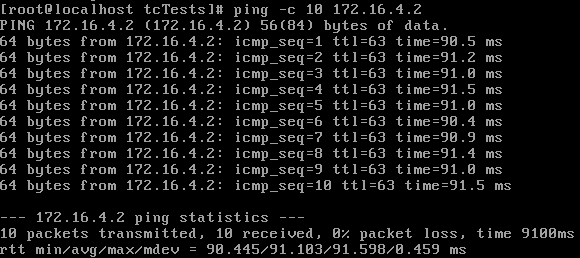
These numbers look good, suggesting that the amount of overhead for delayed packets is minimal, being noticeable on the low end only. The other explanation could be that our delay is limited by the clock resolution of the kernel, and 3ms is an invalid interval. But based on these tests, I conclude that adding fixed delay is accurate enough for testing purposes.
Variable Delay
tc also allows us to introduce variation to our delay. For random variation:
tc qdisc add dev eth3 root netem delay 10ms 5ms
This would give us random variation of 10ms +/- 5ms. If we want to get even more “accurate”, we can add a correlation as well:
tc qdisc add dev eth3 root netem delay 10ms 5ms 25%
This means the added delay is 10ms +/- 5ms with the next random element depending 25% on the last one. Note that this is an approximation, not a true statistical correlation.
However, it is more common to use a distribution to describe the delay variation. The tc tool includes several tables to specify a non-uniform distribution (normal, pareto, paretonormal).
tc qdisc add dev eth3 root netem delay 10ms 5ms distribution normal
The actual tables that tc uses are generated as part of the iproute2 compilation and can be found under /usr/lib64/tc ; so it is possible (with some effort) to make your own distribution, based on your own experimental data.
Here are three short tests running pings against the delay command above:
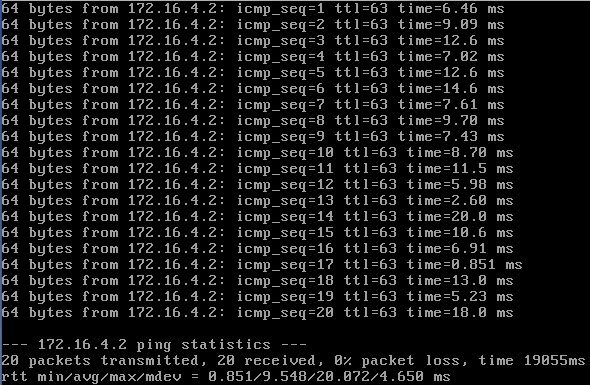
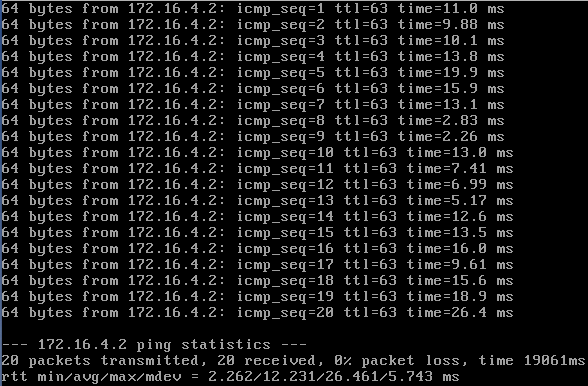
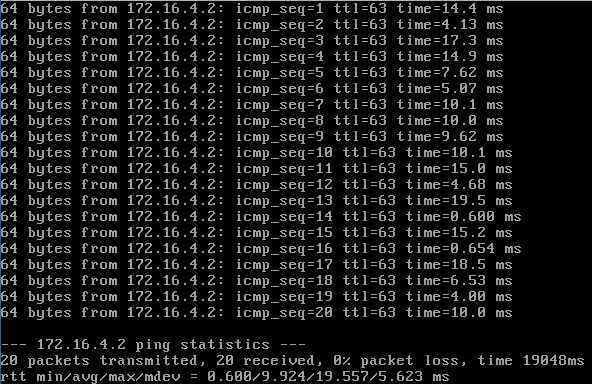
So it looks like the injected delay usually falls in the specified range, but it looks like there are a couple of values that had no delay added (e.g., 0.851ms response) or had an extra large delay added (26.4ms response). Again, I would conclude that the approximation is just that, an approximation. This should be good enough for testing purposes.
Rate
Contrary to common assumptions, the “limit” parameter is not intended to limit the rate at which packets are sent. When using the limit parameter with a token bucket filter, it specifies the number of bytes that can be queued waiting for tokens. From the man page:
limit or latency – Limit is the number of bytes that can be queued waiting for tokens to become available. You can also specify this the other way around by setting the latency parameter, which specifies the maximum amount of time a packet can sit in the TBF. The latter calculation takes into account the size of the bucket, the rate and possibly the peakrate (if set). These two parameters are mutually exclusive.
When using the limit parameter with netem, the effect is different:
limit packets – limits the effect of selected options to the indicated number of next packets.
So discipline context matters, but limit still can’t be used to specify a bitrate in either case.
With that being said, how does one specify a rate to limit bandwidth? Unfortunately, the netem discipline does not include rate control. However, other disciplines (such as TBF, CBQ, or HTB), do.
Let’s look at an example:
tc qdisc add dev eth0 root handle 1:0 netem delay 100ms

tc qdisc add dev eth0 parent 1:1 handle 10: tbf rate 256kbit buffer 1600 limit 3000
The first command sets up our root qdisc with a handle named 1:0 (which is equivalent to 1: since the minor number of a qdisc is always 0) and a packet delay of 100ms. The second command creates a child class with 1: as the parent (since 1:1 has the same major number). This child class could now be referenced using its handle, 10:, and its children would be 10:1, 10:2, etc. You’ll notice the “tbf” which creates a token bucket filter using the rate specified (256kbit in this case) along with the buffer and limit values (which as we now know, that means a max of 3000 bytes can be queued waiting for tokens). The buffer value tells us the size of the bucket in bytes. A little more info on the buffer parameter, from the man page:
burst – Also known as buffer or maxburst. Size of the bucket, in bytes. This is the maximum amount of bytes that tokens can be available for instantaneously. In general, larger shaping rates require a larger buffer. For 10mbit/s on Intel, you need at least 10kbyte buffer if you want to reach your configured rate!
If your buffer is too small, packets may be dropped because more tokens arrive per timer tick than fit in your bucket. The minimum buffer size can be calculated by dividing the rate by HZ.
A quick note about the man page description – it’s a bit outdated, as it was written before many kernels had gone tickless. Now that modern CPUs have high resolution timers and modern Linux is tickless, it’s no longer an issue having to worry about making your bucket big enough for the tokens in a tick. So we can think of “buffer” more of a “burst” because it is the number of bytes that can be sent at unlimited speed before rate limiting kicks in. If this behavior is undesirable, you can add the “peakrate” parameter to limit the speed at which the bucket empties.
So now our rate on eth0 is throttled to 256kbit, coupled with a packet delay of 100ms.
Controlling the rate with tc is by far the most complicated feature. There are many ways to do it, and if you configure it incorrectly, you may get unexpected/inconsistent results. If you are going to be doing a lot of rate control with tc, I encourage you to take the time to read more about classful queueing disciplines to get a better handle (no pun intended) on how this actually works.
Filters
Ok, so now you can shape outgoing traffic! But what if you only want to shape traffic on a certain port, or traffic going to a particular IP address? With filters, you can do just that.
Here’s an example that only controls traffic headed to one IP address.
tc qdisc add dev eth0 root handle 1: prio

tc qdisc add dev eth0 parent 1:3 handle 30: tbf rate 20kbit buffer 1600 limit 3000

tc filter add dev eth0 protocol ip parent 1:0 prio 3 u32 match ip dst 65.172.181.4/32 flowid 1:3
The first command makes a simple priority queuing discipline. The second command creates a token bucket filter to do rate control (20kbit). The last command adds a filter to specify that all packets headed for 65.172.181.4 should be classified as priority 3, and that matches should go to band 1:3 (which in this case is our token bucket filter).
Filters can get pretty complicated, but if you understand how they work, you can match any sort of traffic.
References & Further Reading
Quick Rundown: http://www.linuxfoundation.org/collaborate/workgroups/networking/netem
Traffic Control bible: http://lartc.org/howto/index.html
HTB Manual: http://luxik.cdi.cz/~devik/qos/htb/manual/userg.htm
TBF Man Page: http://linux.die.net/man/8/tc-tbf
NetEm Man Page: http://man7.org/linux/man-pages/man8/tc-netem.8.html
Empirical Study of NetEm: http://www.idi.ntnu.no/~alfw/publications/icccn2011-netem.pdf
Sample tc Commands: https://www.badunetworks.com/9-sets-of-sample-tc-commands-to-simulate-common-network-scenarios/